Windows Push Notification Services
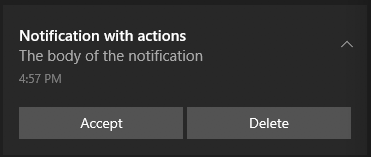
The Windows Push Notification Services (WNS) enable third-party developers to send toast, tile, badge, and raw updates from their own cloud service. This provides a mechanism to deliver new updates to your users in a power-efficient and dependable way.
This section describes how to setup your AIR application to use WNS with this extension.
WNS is supported by all of the variants of this extension. It is the core notification service on Windows and requires minimal additional libraries so we have included it in every variant.
There are several additional things to consider on Windows:
- Appx Packaging
- Additional Dependencies
- [.Net Framework]](#net-framework)
- [C++ Redistributable]](#c-redistributable)
Setup
You should firstly setup WNS for your application. See the setup documentation to guide you through this process.
Install
The simplest way to install and manage your AIR native extensions and libraries is to use the AIR Package Manager (apm). We highly recommend using apm, as it will handle downloading all required dependencies and manage your application descriptor (Android manifest additions, iOS info additions etc).
However you can choose to install it manually, as you would have done in the past.
- APM
- Manual
Note: All of the commands below should be run in a terminal / command prompt in the root directory of your application, generally the level above your source directory.
If you don't have an APM project setup, expand the guide below to setup an APM project before installing the extension.
Setup APM
Install APM
If you haven't installed apm follow the install guide on airsdk.dev.
Setup an APM project
You will need an APM project for your application.
There are many ways to do this and for more options see the APM documentation. Here we will just initialise a new empty project:
apm init
Check your github token
We use github to secure our extensions so you must have created a github personal access token and configured apm to use it.
To do this create a token using this guide from github and then set it in your apm config using:
apm config set github_token ghp_XXXXXXXXXXXXXXXXXXXXXXXXXXXX
If you don't do this correctly you may find the install will fail.
Install the extension
Install the extension by running:
apm install com.distriqt.PushNotifications
This will download and install the extension, required assets, and all dependencies.
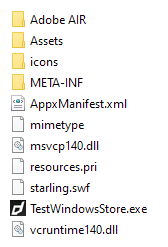
Once complete apm will have created something like the following file structure:
.
|____ ane
| |____ com.distriqt.PushNotifications.ane	# PushNotifications extension
| |____ [dependencies]
|____ apm_packages							# cache directory - ignore
|____ project.apm							# apm project file
- Add the
anedirectory to your IDE. See the tutorials located here on adding an extension to your IDE.
We suggest you use the locations directly in your builds (rather than copying the files elsewhere) so that updates with apm will be pulled automatically into your build.
The following guide is used to manually install the extension, download dependencies and update the application descriptor. We highly recommend installing extensions using apm. Using apm will automate the installation and automatically handle updates and dependencies along with greatly simplifying the application descriptor generation.
First step is always to add the extension to your development environment. Download the extension from the repository and then follow the tutorial located here to add the extension to your development environment.
To use this service you can add any variant of the extension to your project. You should only add one of the variants to your project.
All variants of the Push Notifications extension have the same extension id: com.distriqt.PushNotifications so you should add this to your extensions list in your application descriptor:
<extensions>
	...

	<extensionID>com.distriqt.PushNotifications</extensionID>

	...
</extensions>
Dependencies
Many of our extensions use some common libraries, for example, the Android Support libraries.
We have to separate these libraries into separate extensions in order to avoid multiple versions of the libraries being included in your application and causing packaging conflicts. This means that you need to include some additional extensions in your application along with the main extension file.
You will add these extensions as you do with any other extension, and you need to ensure it is packaged with your application.
Core
The Core extension is required by this extension. You must include this extension in your application.
This extension requires you call the init() function at some point early in your application, generally at the same time as the initialisation of this extension. If you are using other extensions that also require the Core extension, you only need to initialise it once, before initialising the other extensions.
Core.init();
The Core extension doesn't provide any functionality in itself but provides support libraries and frameworks used by our extensions. It also includes some centralised code for some common actions that can cause issues if they are implemented in each individual extension.
You can access this extension here: https://github.com/distriqt/ANE-Core.
Application Descriptor
- APM
- Manual
Updating your application descriptor will insert the required extensionID's and generate the manifest and info additions for your application.
You update your application descriptor by running:
apm generate app-descriptor src/MyApp-app.xml
Change the path (src/MyApp-app.xml) to point to your application descriptor.
This will modify your application descriptor replacing the manifest additions and info additions with the ones generated from apm.
You should backup your application descriptor before running this command to ensure you don't lose any information.
If you need to insert custom data into these sections see the guides for Android and iOS
Extension IDs
The following should be added to your extensions node in your application descriptor to identify all the required ANEs in your application:
<extensions>
    <extensionID>com.distriqt.PushNotifications</extensionID>
    <extensionID>com.distriqt.Core</extensionID>
</extensions>
Additional Dependencies
.Net Framework
This extension requires v4.6 or higher of the .Net framework. This should come preinstalled on any Windows 10 or higher machine so if you are targetting those you should not have to do anything. If however you are targetting older versions of Windows you must ensure .Net v4.6 or higher is installed either manually or as part of an installer.
C++ Redistributable
The native code has a dependency on the Visual C++ 2017 Redistributable package. This package contains code that is required to run code developed using C++ in Visual Studio and is very common amongst Windows applications.
There are two ways to ensure this is available to your application:
- Create an installer that includes the redistributable installer;
- Package the required DLL files from the redistributable with your application;
The first is the suggested method. Installing the redistributable via an installer allows it to be put into the windows update process, allowing bug fixes and security updates to be handled automatically.
The second method is only advised if you need a complete standalone application, where you don't (or cannot) use an installation process. This requires you to package DLLs from the redistributable with your application.
Creating an Installer
There are many methods to create application installers and many tutorials available. We suggest you find a method suitable to your environment and application and utilise the tutorials online.
Some methods include:
Tutorials:
You need to include the x86 c++ 2017 redistributable in the installer, there are many examples and documentation online to achieve this.
Packaging DLLs
Packaging the DLLs into your application involves copying the DLLs specified below into your application root and including in your application package.
The best option is to install Visual Studio 2017 and locate the Program Files[ (x86)]\Microsoft Visual Studio\2017\edition\VC\Redist\MSVC\lib-version folder, eg: C:\Program Files (x86)\Microsoft Visual Studio\2017\Community\VC\Redist\MSVC\14.16.27012\x86\Microsoft.VC141.CRT
Alternatively, download and install the x86 redistributable from the Microsoft website. This should install the DLLs into C:\Windows\System32 folder.
Open the folder and copy the following DLLs to your application:
msvcp140.dllvcruntime140.dll
If you are having issues locating these files, feel free to contact us for help.
You should ensure you are allowed to package these files as per the Microsoft Software License terms but generally these are safe to redistribute subject to the license terms. More information here: Redistributing Visual C++ Files
You should get legal advice if you are unsure.