Apple Push Notification Service
Apple Push Notification Service (APNS) is the push notification system for use on iOS with iPhones, iPads and other such iOS devices.
This section describes how to setup your AIR application to use Apple Push Notification Service (APNS) with this extension.
This service is supported by all the variants however we suggest using one of the following variants:
- base variant (i.e. the main extension)
- Includes FCM on Android
- APNS (this is an air package only for
apm)- iOS only, same as the base variant but includes none of the FCM dependencies for Android
The other variants can be used but there is additional configuration that is needed.
Setup
You should firstly setup the APNS service for your application. Follow the setup guide for instructions.
Install
The simplest way to install and manage your AIR native extensions and libraries is to use the AIR Package Manager (apm). We highly recommend using apm, as it will handle downloading all required dependencies and manage your application descriptor (Android manifest additions, iOS info additions etc).
However you can choose to install it manually, as you would have done in the past.
- APM
- Manual
Note: All of the commands below should be run in a terminal / command prompt in the root directory of your application, generally the level above your source directory.
If you don't have an APM project setup, expand the guide below to setup an APM project before installing the extension.
Setup APM
Install APM
If you haven't installed apm follow the install guide on airsdk.dev.
Setup an APM project
You will need an APM project for your application.
There are many ways to do this and for more options see the APM documentation. Here we will just initialise a new empty project:
apm init
Check your github token
We use github to secure our extensions so you must have created a github personal access token and configured apm to use it.
To do this create a token using this guide from github and then set it in your apm config using:
apm config set github_token ghp_XXXXXXXXXXXXXXXXXXXXXXXXXXXX
If you don't do this correctly you may find the install will fail.
Install the extension
Install the extension by running:
apm install com.distriqt.PushNotifications
If you are using the iOS only install
com.distriqt.PushNotifications-APNSinstead.
This will download and install the extension, required assets, and all dependencies.
Once complete apm will have created something like the following file structure:
.
|____ ane
| |____ com.distriqt.PushNotifications.ane	# PushNotifications extension
| |____ [dependencies]
|____ apm_packages							# cache directory - ignore
|____ project.apm							# apm project file
- Add the
anedirectory to your IDE. See the tutorials located here on adding an extension to your IDE.
We suggest you use the locations directly in your builds (rather than copying the files elsewhere) so that updates with apm will be pulled automatically into your build.
-
You must set a few pieces of configuration information for APNS. This will allow
apmto automatically insert them into the correct position in your application descriptor. This includes:bundleSeedId: Bundle Seed Id (or App ID Prefix) for your iOS applicationapsEnvironment:productionfor release builds anddevelopmentfor development buildsgetTaskAllow:falsefor release builds andtruefor development builds
You can call the following to step through the all the configuration values for this extension:
apm project config set com.distriqt.PushNotifications
We suggest creating a build type to allow you to easily switch between the production and development configurations. To do this run the following additional commands (assuming you setup the main configuration for production):
apm -b development project config set apsEnvironment development
apm -b development project config set getTaskAllow true
This will set the values of those properties to be different for the "development" build type.
The following guide is used to manually install the extension, download dependencies and update the application descriptor. We highly recommend installing extensions using apm. Using apm will automate the installation and automatically handle updates and dependencies along with greatly simplifying the application descriptor generation.
First step is always to add the extension to your development environment. Download the extension from the repository and then follow the tutorial located here to add the extension to your development environment.
Dependencies
Many of our extensions use some common libraries, for example, the Android Support libraries.
We have to separate these libraries into separate extensions in order to avoid multiple versions of the libraries being included in your application and causing packaging conflicts. This means that you need to include some additional extensions in your application along with the main extension file.
You will add these extensions as you do with any other extension, and you need to ensure it is packaged with your application.
Core
The Core extension is required by this extension. You must include this extension in your application.
This extension requires you call the init() function at some point early in your application, generally at the same time as the initialisation of this extension. If you are using other extensions that also require the Core extension, you only need to initialise it once, before initialising the other extensions.
Core.init();
The Core extension doesn't provide any functionality in itself but provides support libraries and frameworks used by our extensions. It also includes some centralised code for some common actions that can cause issues if they are implemented in each individual extension.
You can access this extension here: https://github.com/distriqt/ANE-Core.
Application Descriptor
- APM
- Manual
Updating your application descriptor will insert the required extensionID's and generate the manifest and info additions for your application.
You update your application descriptor by running:
apm generate app-descriptor src/MyApp-app.xml
Change the path (src/MyApp-app.xml) to point to your application descriptor.
If you setup a development build type you can update your app descriptor with this configuration by using :
apm -b development generate app-descriptor src/MyApp-app.xml
Or you could maintain a separate "development" app descriptor by changing the output eg:
apm -b development generate app-descriptor src/MyApp-dev-app.xml
This will modify your application descriptor replacing the manifest additions and info additions with the ones generated from apm.
You should backup your application descriptor before running this command to ensure you don't lose any information.
If you need to insert custom data into these sections see the guides for Android and iOS
Note the difference between a development and production / adhoc entitlements. The get-task-allow and aps-environment must be set correctly for your build.
These values must match the values in your provisioning profile, ie you must have setup push notifications for the matching environment.
Extension IDs
The following should be added to your extensions node in your application descriptor to identify all the required ANEs in your application:
<extensions>
	<extensionID>com.distriqt.PushNotifications</extensionID>
	<extensionID>com.distriqt.Core</extensionID>
</extensions>
iOS
Info Additions and Entitlements
Push notifications require a few additions to the Info plist and Entitlements section of your application to correctly configure your application for push notifications.
You should add the listing below to application descriptor iPhone node.
You must replace the BUNDLE_SEED_ID and BUNDLE_IDENTIFIER with the information you
gathered when setting up your application. Also make sure you set the environment
correctly either using production or development, both are shown in the example
below with the production version commented out. More on this below.
<iPhone>
	<InfoAdditions><![CDATA[
	]]></InfoAdditions>
	<requestedDisplayResolution>high</requestedDisplayResolution>
	<Entitlements><![CDATA[

		<!-- DEVELOPMENT -->
		<key>get-task-allow</key>
		<true/>
		<key>aps-environment</key>
		<string>development</string>

		<!-- PRODUCTION -->
		<!--
		<key>get-task-allow</key>
		<false/>
		<key>aps-environment</key>
		<string>production</string>
		-->

		<key>application-identifier</key>
		<string>BUNDLE_SEED_ID.BUNDLE_IDENTIFIER</string>
		<key>keychain-access-groups</key>
		<array>
			<string>BUNDLE_SEED_ID.*</string>
		</array>

	]]></Entitlements>
</iPhone>
The first entitlement field is the aps-environment. This field indicates whether
we are using the development or the production environment. It must be either
development or production and depends on which configuration you are using.
If you are running a debug build you should use development. If you are looking
to publish the application to the AppStore, you should use production.
You should have noted the BUNDLE_SEED_ID (or App ID Prefix) and BUNDLE_IDENTIFIER
when you were setting up your application in the iOS developer center.
The seed id should be a unique ten character string and the identifier should be
similar to your AIR application id.
Note the difference between a development and production / adhoc entitlements. The get-task-allow and aps-environment must be set correctly for your build.
These values must match the values in your provisioning profile, ie you must have setup push notifications for the matching environment.
Background notifications
Optional
If you are planning to setup your application to receive background notifications then you need to include some additional configuration.
If it is enabled, you will be able to send silent notifications in the background to trigger an event when your application is running in the background. If you do not include it, then you will only receive the notification events in the background when the user clicks a notification.
However it is not required if you do not wish to include it.
- APM
- Manual
Firstly add a custom iOS configuration file by running:
apm generate config ios
Edit the config/ios/InfoAdditions.xml file that was generated to resemble the following, adding the UIBackgroundModes node:
<plist version="1.0">
    <dict>

        <key>UIDeviceFamily</key>
        <array>
            <string>1</string>
            <string>2</string>
        </array>

		<key>UIBackgroundModes</key>
		<array>
			<string>remote-notification</string>
		</array>

    </dict>
</plist>
You can add any other information you need in your info additions in this file as well, such as MinimumOSVersion or your UILaunchStoryboardName.
Once you have added this configuration run the steps above to update / generate your application descriptor.
If you are planning to setup your application to receive background notifications then you should include the UIBackgroundModes key:
<key>UIBackgroundModes</key>
<array>
	<string>remote-notification</string>
</array>
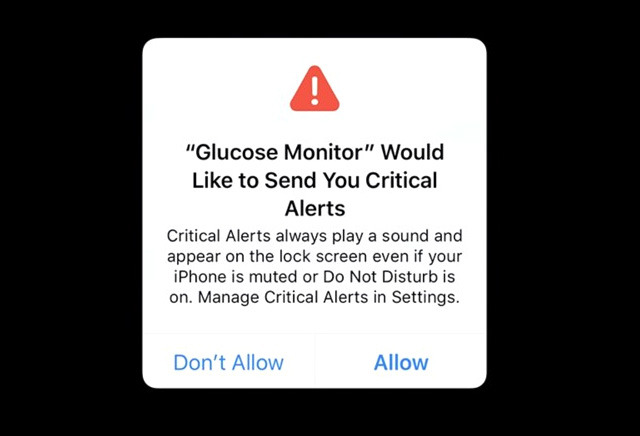
Critical Alerts
Optional
Critical alerts are important notifications that will ignore Do Not Disturb mode, and ringer settings, so they cannot be muted.
This is an opt-in service and developers must request approval from Apple in order to add this feature to an application. Generally only applications that send notifications related to health, public safety and home security are approved.
If you are approved by Apple then to enable critical alerts you will need to add some additions to your Entitlements section.
- APM
- Manual
Firstly add a custom iOS configuration file by running:
apm generate config ios
Edit the config/ios/Entitlements.xml file that was generated to resemble the following:
<plist version="1.0">
    <dict>

        <key>com.apple.developer.usernotifications.critical-alerts</key>
		<true/>

    </dict>
</plist>
You can add any other information you need in your info additions in this file as well, such as MinimumOSVersion or your UILaunchStoryboardName.
Once you have added this configuration run the steps above to update / generate your application descriptor.
Add the following to your Entitlements section in your application descriptor:
<key>com.apple.developer.usernotifications.critical-alerts</key>
<true/>
Additionally you will need to request authorisation from the user. This is handled as part of the normal authorisation process however you need to inform the extension that you require critical alerts by calling setShouldRequestCriticalAlerts() on your Service configuration:
var service:Service = new Service()
	.setShouldRequestCriticalAlerts();

// Other service options