Auth - Provider - Email Link
You can use Firebase Authentication to sign in a user by sending them an email containing a link, which they can click to sign in. In the process, the user's email address is also verified.
There are numerous benefits to signing in by email:
- Low friction sign-up and sign-in.
- Lower risk of password reuse across applications, which can undermine security of even well-selected passwords.
- The ability to authenticate a user while also verifying that the user is the legitimate owner of an email address.
- A user only needs an accessible email account to sign in. No ownership of a phone number or social media account is required.
- A user can sign in securely without the need to provide (or remember) a password, which can be cumbersome on a mobile device.
- An existing user who previously signed in with an email identifier (password or federated) can be upgraded to sign in with just the email. For example, a user who has forgotten their password can still sign in without needing to reset their password.
Enable Email Link sign-in
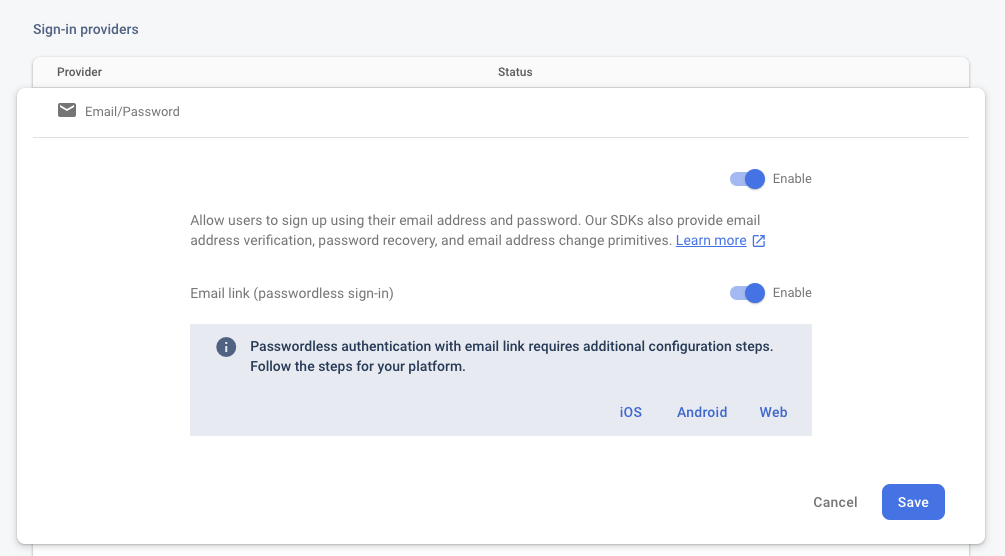
To sign in users by email link, you must first enable the Email provider and Email link sign-in method for your Firebase project:
- In the Firebase console, open the Auth section.
- On the Sign in method tab, enable the Email/Password provider. Note that email/password sign-in must be enabled to use email link sign-in.
- In the same section, enable Email link (passwordless sign-in) sign-in method.
- Click Save.
Send an authentication link
To initiate the authentication flow, present the user with an interface that prompts the user
to provide their email address and then call sendSignInLinkToEmail() to request that
Firebase send the authentication link to the user's email.
-
Construct the ActionCodeSettings object, which provides Firebase with instructions on how to construct the email link. Set the following fields:
url: The deep link to embed and any additional state to be passed along. The link's domain has to be whitelisted in the Firebase Console list of authorized domains, which can be found by going to the Sign-in method tab (Authentication -> Sign-in method). The link will redirect the user to this URL if the app is not installed on their device and the app was not able to be installed.androidPackageNameandIOSBundleId: The apps to use when the sign-in link is opened on an Android or iOS device.handleCodeInApp: Set totrue. The sign-in operation has to always be completed in the app unlike other out of band email actions (password reset and email verifications). This is because, at the end of the flow, the user is expected to be signed in and their Auth state persisted within the app.
-
Ask the user for their email.
-
Send the authentication link to the user's email, and save the user's email in case the user completes the email sign-in on the same device.
var email:String = "some@email.com";

var actionCodeSettings:ActionCodeSettings = new ActionCodeSettings()
	// URL you want to redirect back to. The domain (www.example.com) for this
	// URL must be whitelisted in the Firebase Console.
	.setUrl( "https://www.example.com/finishSignUp?cartId=1234" )
	.setHandleCodeInApp( true )
	.setIOSBundelId( "com.example.ios" )
	.setAndroidPackageName(
		"com.example.android",
		true,  /* installIfNotAvailable */
		"1" /* minimumVersion */ );

FirebaseAuth.service.sendSignInLinkToEmail( Config.email, actionCodeSettings );
This process will dispatch a complete event when the process was completed with a success flag similar to other events in this extension:
FirebaseAuth.service.addEventListener(
	FirebaseAuthEvent.SEND_SIGNIN_LINK_TO_EMAIL_COMPLETE,
	sendSignInLinkToEmail_completeHandler );


function sendSignInLinkToEmail_completeHandler( event:FirebaseAuthEvent ):void
{
	trace( "sendSignInLinkToEmail():complete:" + event.success );
}
At this point the user will need to check their email and click on the link in the email.
URL
For the URL, Firebase suggests you use your Firebase app url (https://PROJECT_ID.firebaseapp.com). This normally can be found by checking the Authorized Domains in the Firebase Console under Authentication > Sign in Method
Using this method simplifies the development and integration required.
This guide will assume this approach however you can use whatever approach suits you needs to handle the url redirection.
Complete sign in with the email link
Completing sign-in in an Android App
Firebase Authentication uses Firebase Hosting to send the email link to a mobile device. For sign-in completion via mobile application, the application has to be configured to detect the incoming application link, parse the underlying deep link and then complete the sign-in. To learn more, see Android App Links documentation.
Configure Firebase Hosting
Firebase Authentication uses Firebase Hosting domains when creating and sending a link that is meant to be opened in a mobile application. A default Firebase Hosting domain has already been configured for you.
- Configure Firebase Hosting domains:
In the Firebase console, open the Hosting section.
- If you want to use the default domain for the email link that opens in mobile applications, go to your default site and take note of your default Hosting domain. A default Hosting domain typically looks like this:
PROJECT_ID.firebaseapp.com. You'll need this value when you configure your app to intercept the incoming link. - If you want to use a custom domain for the email link, you can register one with Firebase Hosting and use that for the link's domain.
- Configuring Android applications:
In order to handle these links from your Android application, your app's package name needs to be specified in the Firebase console project settings. In addition, the SHA-1 and SHA-256 of the application certificate need to be provided.
To configure your Android application, follow these steps:
- APM
- Manual
apm generate config android
Edit the AndroidManifest.xml that was created at config/android/AndroidManifest.xml file to include the following intent filter:
<?xml version="1.0" encoding="utf-8"?>
<manifest xmlns:android="http://schemas.android.com/apk/res/android" xmlns:tools="http://schemas.android.com/tools">

    <uses-sdk android:minSdkVersion="23" android:targetSdkVersion="35" />
    <uses-prermission android:name="android.permission.INTERNET" />
    <application>
        <activity>
            <intent-filter>
                <action android:name="android.intent.action.MAIN"/>
                <category android:name="android.intent.category.LAUNCHER"/>
            </intent-filter>
            <intent-filter android:autoVerify="true">
                <action android:name="android.intent.action.VIEW" />
                <category android:name="android.intent.category.DEFAULT" />
                <category android:name="android.intent.category.BROWSABLE" />
                <data
                android:scheme="https"
                android:host="<PROJECT_ID>.firebaseapp.com"
                android:pathPrefix="/__/auth/links" />
            </intent-filter>
        </activity>
    </application>

</manifest>
Then regenerate the application descriptor:
apm generate app-descriptor
In your application descriptor, you need to add an intent filter that will handle the incoming link. This is done by adding the following code to your manifest additions:
<uses-sdk android:minSdkVersion="23" android:targetSdkVersion="35" />
<uses-prermission android:name="android.permission.INTERNET" />
<application>
	<activity>
		<intent-filter>
			<action android:name="android.intent.action.MAIN"/>
			<category android:name="android.intent.category.LAUNCHER"/>
		</intent-filter>
		<intent-filter android:autoVerify="true">
			<action android:name="android.intent.action.VIEW" />
			<category android:name="android.intent.category.DEFAULT" />
			<category android:name="android.intent.category.BROWSABLE" />
			<data
			android:scheme="https"
			android:host="<PROJECT_ID>.firebaseapp.com"
			android:pathPrefix="/__/auth/links" />
		</intent-filter>
	</activity>
</application>
It's important that the <activity> element has no attributes and that you leave the first <intent-filter> element as is,
as this is required for the AIR application to be launched correctly.
Also you must replace <PROJECT_ID>.firebaseapp.com with your actual domain, either <PROJECT_ID>.firebaseapp.com or your custom domain.
When users open a hosting link in your Android app, the app will be launched and the extension will receive the link and dispatch the FirebaseAuthEvent.EMAIL_LINK_RECEIVED event:
FirebaseAuth.service.addEventListener( FirebaseAuthEvent.EMAIL_LINK_RECEIVED, emailLink_receivedHandler );

function emailLink_receivedHandler( event:FirebaseAuthEvent ):void
{
    // Handle the email link authentication here
}
Verify link and sign in
After you receive the link as described above, verify that it is meant for email link authentication and complete the sign in.
You can check if a link is a "sign in with email link" by using the isSignInWithEmailLink() function:
if (FirebaseAuth.service.isSignInWithEmailLink( link ))
{
	// This is a "sign in with email link"
}
You then can sign in the user using their email and the email link by calling the signInWithEmailLink() function:
if (FirebaseAuth.service.isSignInWithEmailLink( link ))
{
	// Initiate the sign in process
	FirebaseAuth.service.signInWithEmailLink( email, link );
}
The sign in process will dispatch an event once complete:
FirebaseAuth.service.addEventListener(
	FirebaseAuthEvent.SIGNIN_WITH_EMAILLINK_COMPLETE,
	signInWithEmailLink_completeHandler );

function signInWithEmailLink_completeHandler( event:FirebaseAuthEvent ):void
{
	trace( "signInWithEmailLink():complete:" + event.success );
}
Of course you can use your global FirebaseAuthEvent.AUTHSTATE_CHANGED to listen for sign in success as well as this handler.
Linking/re-authentication with email link
You can also link this method of authentication to an existing user. For example a user previously authenticated with another provider, such as a phone number, can add this method of sign-in to their existing account.
var credential:AuthCredential = EmailAuthProvider.getEmailLinkCredential( email, link );

var user:FirebaseUser = FirebaseAuth.service.getCurrentUser();

user.linkWithCredential( credential );
Differentiating email/password from email link
This functionality has been deprecated in order to improve user account security.
In case you support both password and link-based sign in with email, to differentiate the method of sign in for a password/link user, use fetchSignInMethodsForEmail(). This is useful for identifier-first flows where the user is first asked to provide their email and then presented with the method of sign-in:
FirebaseAuth.service.addEventListener(
		FirebaseAuthMethodsEvent.FETCH_SIGNIN_METHODS_COMPLETE,
		fetchSignInMethodsForEmail_completeHandler );

FirebaseAuth.service.fetchSignInMethodsForEmail( Config.email );

function fetchSignInMethodsForEmail_completeHandler( event:FirebaseAuthMethodsEvent ):void
{
	trace( "fetchSignInMethodsForEmail():complete:" + event.success );
	if (event.methods != null)
	{
		for each (var method:String in event.methods)
		{
			if (EmailAuthCredential.EMAIL_LINK_SIGN_IN_METHOD == method)
			{
				// User can sign in with email/link
			}
			else if (EmailAuthCredential.EMAIL_PASSWORD_SIGN_IN_METHOD == method)
			{
				// User can sign in with email/password
			}
		}
	}

}
Note: email/password and email/link are considered the same EmailAuthProvider (same PROVIDER_ID) with different methods of sign-in.