Scanning
Once you have setup your application and gained permission to access the camera, then there are three approaches you can take to scan, 2 that utilise the camera directly and a third option to scan a provided image.
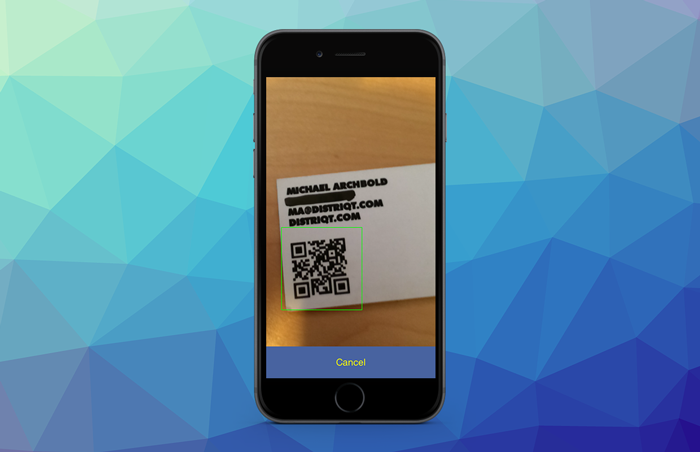
The first is using a fullscreen activity which will take over the fullscreen of your application, presenting a camera preview and some UI elements.
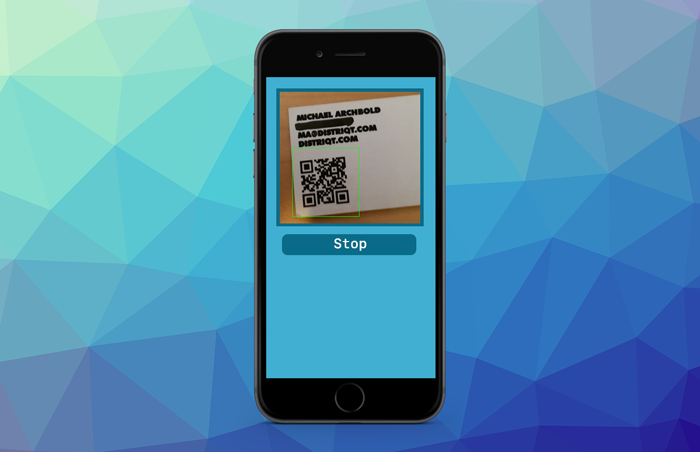
The second is to show a preview contained within an area (viewport) of your application. This view will sit above any other elements however you can create a UI around the preview to control the scanner or present feedback to your user.
The third is to scan an image directly by passing bitmap data to the extension.
Below we describe the methods using the camera. You can find information on bitmap data scanning here.
Ensure you have requested authorisaton to use the camera before attempting to use these methods.
Scan Activity
To start the fullscreen scan activity, call the startScanActivity() method passing in the required options. This method takes several parameters:
ActivityOptions: instance describing the appearance of the fullscreen UI elements;ScannerOptions: describing the options for the scanning algorithm (eg symbologies);CameraOptions: options for configuring the camera such as whether to use the front or rear camera;
You can pass in null (the default) for all the options to simply use the defaults.
Scanner.service.startScanActivity();
This function will return a Boolean value indicating the success of the start request. If it returns false there may be another scan in progress or there was an error.
To specify options:
var scanOptions:ScannerOptions = new ScannerOptions();
scanOptions.symbologies = [];

var uiOptions:ActivityOptions = new ActivityOptions();
uiOptions.singleResult = false;
uiOptions.heading = "Scan a barcode";
uiOptions.cancelLabel = "FINISH";
uiOptions.colour = 0x4863A0;
uiOptions.textColour = 0xFFFFFF;

uiOptions.overlay = _overlay.bitmapData;
uiOptions.overlayAutoScale = true;

var cameraOptions:CameraOptions = new CameraOptions();
cameraOptions.refocusInterval = 0;
cameraOptions.camera    = CameraOptions.CAMERA_REAR;
cameraOptions.torchMode = CameraOptions.TORCH_AUTO;

var success:Boolean = Scanner.service.startScanActivity(
        scanOptions,
        uiOptions,
        cameraOptions
);
Scan in Viewport
To start the scan in a viewport call the startScanInViewport() method passing in the required options. This method takes several parameters:
ViewportOptions: instance describing the viewport for the camera preview;ScannerOptions: describing the options for the scanning algorithm (eg symbologies);CameraOptions: options for configuring the camera such as whether to use the front or rear camera;
You can pass in null (the default) for all the options to simply use the defaults, however we suggest you at least pass a valid ViewportOptions instance to set the initial frame for the camera preview.
var frame:Rectangle = ...;

var viewportOptions:ViewportOptions = new ViewportOptions()
        .setFrame( frame );

Scanner.service.startScanInViewport( viewportOptions );
To specify all the options:
var viewportOptions:ViewportOptions = new ViewportOptions()
        .setFrame( new Rectangle( 100, 100, 500, 300 ) );

var scanOptions:ScannerOptions = new ScannerOptions()
        .setSymbologies( [ Symbology.QRCODE ] );

var cameraOptions:CameraOptions = new CameraOptions()
        .setCamera( CameraOptions.CAMERA_REAR )
        .setTorchMode( CameraOptions.TORCH_AUTO );

var success:Boolean = Scanner.service.startScanInViewport(
        viewportOptions,
        scanOptions,
        cameraOptions
);
Updating the Viewport
You can change the viewport frame for the camera preview while scanning is in progress.
To change the viewport frame call the setScanViewport() method passing the new frame:
Scanner.service.setScanViewport(
    new Rectangle( 50, 200, 600, 600 )
);
Stop Scanning
To stop the scan process, call the stopScan() method. This will stop the active scan process independent of the method you are using to scan (i.e. activity or viewport).
Scanner.service.stopScan();
This will stop the scan process and release any camera resources.
Events
There are several events dispatched at various points of the scanning process, these are defined by the ScannerEvent and ScannerErrorEvent classes.
ScannerEvent.CODE_FOUND: Dispatched when a code was detected;ScannerEvent.SCAN_START: Dispatched when a scanning process was started;ScannerEvent.SCAN_STOPPED: Dispatched when a scanning process was stopped / terminated;ScannerEvent.CANCELLED: Dispatched when the user cancels the scan activity;ScannerErrorEvent.ERROR: Dispatched when an error occurred in the scan process;
The most important is probably the CODE_FOUND event that is dispatched with the scan result. This event has a result property that contains information about the scan result as an instance of the ScanResult class.
Scanner.service.addEventListener( ScannerEvent.CODE_FOUND, codeFoundHandler );

function codeFoundHandler( event:ScannerEvent ):void
{
    var result:ScanResult = event.result;

    trace( "code found: " + result.data  );
}
Options
When scanning there are some options that can be used.
Scanner Options
The ScannerOptions class represents any options relating to the scanning algorithm to use, such as the list of symbol types to enable. An instance of this can be passed to any of the scan methods.
To create a ScannerOptions you can use the properties on an instance of the class or use the builder methods.
var scanOptions:ScannerOptions = new ScannerOptions();
scanOptions.symbologies = [ Symbology.QRCODE ];
or
var scanOptions:ScannerOptions = new ScannerOptions()
    .setSymbologies( [ Symbology.QRCODE ] );
Camera Options
The CameraOptions class represents any configuration options around the camera functionality, such as device position.
To create a CameraOptions you can use the properties on an instance of the class or use the builder methods.
var cameraOptions:CameraOptions = new CameraOptions();
cameraOptions.camera    = CameraOptions.CAMERA_REAR;
cameraOptions.torchMode = CameraOptions.TORCH_AUTO;
or
var cameraOptions:CameraOptions = new CameraOptions()
    .setCamera( CameraOptions.CAMERA_REAR )
    .setTorchMode( CameraOptions.TORCH_AUTO );
Viewport Options
The ViewportOptions class represents the options to define the area of the screen to use as the viewport for the startScanInViewport() method.
The most important option here is the frame which defines the area of the screen to place the camera preview. It should be in native pixel coordinates.
var viewportOptions:ViewportOptions = new ViewportOptions()
        .setFrame( new Rectangle( 100, 100, 500, 300 ) );
Activity Options
The ActivityOptions class describes the appearance of the fullscreen UI elements for the startScanActivity() method.
Options include:
cancelLabel: The label to place on the cancel button;singleResult: If this option is true then the scanner will automatically stop and close the interface when a code is successfully scanned;colour: The colour for the background of the interface elements;textColour: The text colour for the text elements;
For more details see the asdocs reference for the ActivityOptions class.