Add the Plugin
First step is always to add the plugin to your development environment.
Asset Store
Open the Asset Store in your browser and add the plugin to your assets.
Open the Package Manager (Window > Package Manager) in the Unity Editor and select the "My Assets" section. Select the plugin, and click Import in the bottom right.
Manual Installation
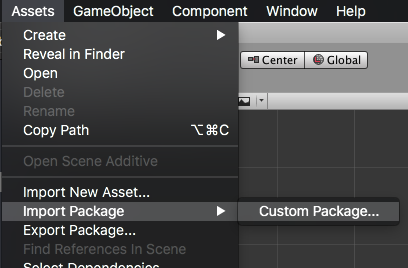
In unity you import the package by selecting Assets / Import Package / Custom Package ... and then browsing to the unity plugin package file: com.distriqt.Share.unitypackage.
You can manually download the extension from our repository:
Import the Plugin
This will present the import dialog and display all the files for the plugin, make sure all the files are selected.
The plugin will be added to your project and you can now use the plugins functionality in your application.
Resolve Android Dependencies
This plugin depends on some common Android libraries, particularly the AndroidX support libraries and the Google Play Services.
You can get these dependencies using one of the following methods.
External Dependency Manager
This is the suggested method.
Use the External Dependency Manager plugin to download and manage the Android dependencies.
Importing
If you already use the External Dependency Manager in your project you can skip this step.
- Download the latest version of the External Dependency Manager from the github repository
- Import the plugin by selecting
Assets / Import Package / Custom Package ...and locate the plugin you downloaded. The plugin will be in the zip named:external-dependency-manager-latest.unitypackage - In the Import Unity Package window, click Import
Resolving
By default, the resolver should run automatically and will add the dependencies required by this plugin.
If you have need to resolve the dependencies manually then you will need to:
- Open the menu under:
Assets / External Dependency Manager / Android Resolver - Select
ResolveorForce Resolve
More information on the External Dependency Manager can be found here
Custom Gradle Template
This applies only if you are using a custom gradle template. If you haven't enabled this then the dependency manager will automatically update this for you.
Unity's in-built gradle build support and exporting to android studio does not support per plugin gradle script. Therefore, this plugin cannot add the dependencies by itself.
The mainTemplate.gradle is generated when you enable the Custom Gradle Template property on the Player window.
The build.gradle exists in generated Gradle project when you enable the Export Project property on the Player window and Build the project.
Update the dependencies section in your mainTemplate.gradle or build.gradle as below:
dependencies {
    implementation fileTree(dir: 'libs', include: ['*.jar'])

    implementation 'androidx.annotation:annotation:1.2.0'
    implementation 'androidx.core:core:1.9.1'
    implementation 'androidx.legacy:legacy-support-v4:1.0.0'
}
Proguard
If you are using a custom proguard configuration you will need to add the following line to ensure the interface class for the plugin is accessible to unity at runtime.
-keep class com.distriqt.extension.share.ShareUnityPlugin {*;}
Checking for Support
You can use the isSupported flag to determine if this extension is supported on the current platform and device.
This allows you to react to whether the functionality is available on the device and provide an alternative solution if not.
if (Share.isSupported)
{
    // Functionality here
}