Requesting Authorisation
When you are going to be accessing the camera you must check that your application has been allowed access. To this end the extension provides several helpers to check and request access to the camera and to the file system to save images. Normal permission rules apply here.
On Android these permissions are listed through the manifest additions.
On older versions of Android these permissions are accepted when the user installs the application.
More modern versions (Marshmallow 6 [v23]+) require that you request the permissions similar to iOS.
You will still need to list them in your manifest and then follow the same code below as for iOS, except that on Android you will be able to ask multiple times.
You should respect the SHOULD_EXPLAIN status by displaying additional information to your user about why you require this functionality.
On iOS the user must be asked at runtime, which you only get one chance to ask, after which you must direct the user to manually change the permissions in the settings.
The following code will work across both platforms:
CameraUI.service.addEventListener( AuthorisationEvent.CHANGED, authorisationStatus_changedHandler );

switch (CameraUI.service.authorisationStatus())
{
    case AuthorisationStatus.SHOULD_EXPLAIN:
    case AuthorisationStatus.NOT_DETERMINED:
        // REQUEST ACCESS: This will display the permission dialog
        CameraUI.service.requestAuthorisation();
        return;

    case AuthorisationStatus.DENIED:
    case AuthorisationStatus.UNKNOWN:
    case AuthorisationStatus.RESTRICTED:
        // ACCESS DENIED: You should inform your user appropriately
        return;

    case AuthorisationStatus.AUTHORISED:
        // AUTHORISED: Camera will be available
        break;
}


function authorisationStatus_changedHandler( event:AuthorisationEvent ):void
{
    trace( "authorisationStatus_changedHandler: "+event.status );
}
Authorisation Types
There are several types of authorisation that you will require for this extension and as they may not be required by all applications they have been separated so you can request them individually as appropriate for your application:
AuthorisationType.CAMERA: Access to the camera deviceAuthorisationType.AUDIO: Access to the microphone deviceAuthorisationType.PHOTOS: Access to the camera roll to save images (only required if you setsaveToCameraRolltotruein the options)
You will need to run through the above process for each of the permissions your application requires!
Camera Permission
While this ANE uses the camera, it does not require the android.permission.CAMERA permission
on Android.
This is because the camera capture is actually offloaded to another system application that requests the permission if required.
If however you added this permission to your manifest, Android requires that you ask the user for permission otherwise will deny this offloading. Hence if you add it to your manifest you will get an extra permission request dialog when requesting permissions. If you don't add it then you will only get the dialog for write permissions to save files appropriately.
Usage Description
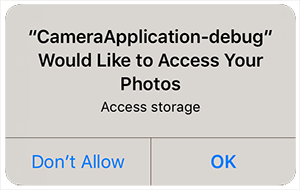
You can customise the usage description messages as you see fit to suit your application. These messages are displayed in the main body area of the iOS authorisation dialog with the title and buttons being standard (and not customisable).
The image below is an example of the authorisation dialog. The content "Access storage" is the usage description message you can set.
You set these values through adding the usage description keys to your info additions or simply by setting up your configuration options in your apm project.
The most important string is the camera usage description
Set the NSCameraUsageDescription key or equivalent apm config parameter to set this text.
To be able to record audio along with your video you will need to add the microphone usage description key NSMicrophoneUsageDescription (or equivalent apm config parameter).
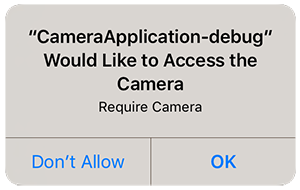
If you are saving images to the camera roll the following dialog will be displayed the first time you attempt to save a captured image to the camera roll:
There are 2 keys required here that control the text in this dialog, NSPhotoLibraryUsageDescription and NSPhotoLibraryAddUsageDescription (and equivalent apm config parameters). The second key was added in iOS 11.2. You should add both keys to your info additions.
Device Settings
If your user has denied access to the camera in some situations you can prompt them to enable them and then redirect them to your application device settings, which will allow your user to change the setting.
This is especially important on iOS where you only get one attempt to ask your user for permission.
To redirect your user simply call the openDeviceSettings() function.
You can use the canOpenDeviceSettings flag to check if the current device supports this functionality.
if (CameraUI.instance.canOpenDeviceSettings)
{
    CameraUI.instance.openDeviceSettings();
}